
It's funny how making one card, leads to making more cards and gives you more ideas. I always said when I used to draw my strip cartoons, 'every cartoon should create at least five more' so the drawing of a daily cartoon for a newspaper should come easy!
A few posts down I showed you how I made my double Z Card. (This'll be the last one, honest!) In that first post I also showed you a picture of the same style of card, facing the other way, in fact, backwards. Well, this gave me another idea. Because you have to join two cards together, you are in fact, if you don't cover it all in glue, creating or able to create, a pocket! A little secret place at the back of the card (Or in this case, at the front!)
In fact so secret, it might be missed! So with a bit of snipping and punching on one of these back parts of the card, then colouring the edge of the pearl card with black, to give the illusion of matting. (Promarkers don't bleed though pearl card) and hey presto, I've made two cards out of one idea.
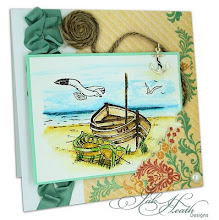
Same papers as the card below. (Kate Knight) Not so much add ons because it would make it too bulky, because, this is the same card. Of course if this was a completely new card (with nothing on the other side) I would then add more to this side. It could do with a couple of flowers, couldn't it!?! There is glitter!
The font is a freebie. It's called Hybrid Hibiscus
Inside the pocket, I was going to push a thin packet of seeds. Off I went to hunt one down, knowing I had loads of seed packets somewhere. Could find any?? No! And then, (made a cup of tea, biscuits, etc) forgot all about talking the photo of the pocket!
Anyway...fast forward... I've now used the pocket to hide some money! (Not much, coz I'm broke!)
The image I used this time is Hedgie with His Sunflower...(One of mine!) Hedgie has been 3D-ed. I printed the first PNG image straight onto the sky background.
Hope you like my 'Hidden Pocket Backward Double Z Card... there's a mouthful! One tip I have is, this image is only fixed to the card at the top, so that when you close it and tie the ribbon it can still go under the topper. Oh and here's the card naked after edging it with a black Promarker...That's it! Secret Revealed! Thank you for stopping by!
A few posts down I showed you how I made my double Z Card. (This'll be the last one, honest!) In that first post I also showed you a picture of the same style of card, facing the other way, in fact,
 backwards. Well, this gave me another idea. Because you have to join two cards together, you are in fact, if you don't cover it all in glue, creating or able to create, a pocket! A little secret place at the back of the card (Or in this case, at the front!)
In fact so secret, it might be missed! So with a bit of snipping and punching on one of these back parts of the card, then colouring the edge of the pearl card with black, to give the illusion of matting. (Promarkers don't bleed though pearl card) and hey presto, I've made two cards out of one idea.
Same papers as the card below. (Kate Knight) Not so much
 add ons because it would make it too bulky, because, this is the same card. Of course if this was a completely new card (with nothing on the other side) I would then add more to this side. It could do with a couple of flowers, couldn't it!?! There is glitter!
The font is a freebie. It's called Hybrid Hibiscus
Inside the pocket, I was going to push a thin packet of seeds. Off I went to hunt one down, knowing I had loads of seed packets somewhere. Could find any?? No! And then, (made a cup of tea, biscuits, etc) forgot all about talking the photo of the pocket!

Anyway...fast forward... I've now used the pocket to hide some money! (Not much, coz I'm broke!)
The image I used this time is Hedgie with His Sunflower...(One of mine!) Hedgie has been 3D-ed. I printed the first PNG image straight onto the sky background.
Hope you like my 'Hidden Pocket Backward Double Z Card... there's a mouthful! One
Challenges
Fun With Shapes And More- Package (right link!)
Digitaltuesday-things that Leap (yep, Hedgehogs leap!)
Alwayscrafting-creative mondays-anything goes
Partytimetuesdays-anything goes

Sorry! I appear to have deleted all the comments again!
Fun With Shapes And More- Package (right link!)
Digitaltuesday-things that Leap (yep, Hedgehogs leap!)
Alwayscrafting-creative mondays-anything goes
Partytimetuesdays-anything goes

Sorry! I appear to have deleted all the comments again!


Is this the card I nearly trod on? Go tidy your craft room!
ReplyDelete