 I've been asked a few times now, how I made my 'Seeing Double' and 'Double Trouble' cards. So I thought the best way to tell you is to show you with this tutorial, plus doing a bit of paper piecing too.
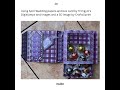
I chose these gingham papers mainly because I knew they came in two different sized checks. I'd use the large check for the card and the smaller check for the blue Giraffe and later for the Pink Elephant. But you can get the same result by just printing out a smaller sheet. (Click on Photo's to make them bigger)
 First, decide on the size you want your image to be, and print it out on white card or paper (these are all on paper*). If you're making two images for a twin card, it's a nice idea to flip one of them over to face the other way*. Leave enough space so you can make a nice shape around it. I chose a rectangle for this blue card and a circle for the Pink Elephant card. Print it out again the same size, (one flipped, one normal) but this time over your gingham paper. as you can see in the picture You don't really have to colour the first image, or maybe just colour the edges that will be seen, as this will be covered. Cut out the printed gingham giraffe, any really fiddly bits, don't worry too much about as they will be seen on the image below.
Any problem just cut them off! (Things like, balloon strings, tuffs of hair, whiskers on other images) I then touch up the edges of the cut out image with a little bit of black pen, this will hide any cutting snags. Then I simply colour the giraffes 'spots' with a pastel blue Promaker, I used a very light grey on the elephant's ears, and eyelids or you could use pink, just to make these areas show up. (I also edged all the way round the 'white' giraffe with the pastel blue too, to add a little lift to the image and to give an appearance of a shadow.

Once the image is completely dry, I then placed it into the palm of my hand, pattern side down and gently circled my finger into the centre of the image until the paper/card curved slightly or you could use an embossing tool with a large ball using the back of a mouse mat to rest the image. (But I think the finger and the warmness of your hand better!

Fix some 3D pads onto the back of the image (or silicone glue) and fix over the top of the first image. I then made up panels of blue card and blue gingham to go onto the front of the gate fold card. Before fixing these to the front of the blank card with large 3D foam pads, I attached the ribbon, so it would be nice and secure, then finished the card off by adding the two panels with the little blue giraffes looking in opposite directions.

Because when the blue gate fold card is open, you can't see the little giraffe's, so when I designed the Pink Elephant card, I made a gate fold from a square card, then cut a second square card in half and folded those halves in half, and then fixed them, as you can see in the pictures, to the front of the gate fold.
(Hope that's clearer than it sounds!)
 Once you've covered the blank card in your chosen papers, attach the two circles with the pink elephants on them but so you could only see one elephant, this time when the card is open you can still see the little elephants. (And suddenly finding there are two elephants is a nice surprise!)
This now leaves a nice space inside, which led to the idea of the little washing line. The clothes are just hand drawn and cut out. Leave little tags on the shoulders to act as pegs, to fix to the washing line. (gold elastic thread) The ribbon on this pink card is fixed at the back under my sticker Hand Made by Lyn and then rapped round to the front.

The pink elephant was fixed flat over the bottom image this time, in stead of using 3D pads, mainly because I had to cut around two of the bubbles. (The bubbles you can see are on the first image hidden beneath the coloured one as is the 'hair'. Hope this has been a help!
Note to Mr Blogger, please make this easier to use!! The pictures do not go where you want them!!
*You can down load the free gingham papers I used for these cards from Here
The images can be found in the
and scroll down quite a bit!
The Sentiments are freebies from
For a free programme where you can 'flip' your images, you can down load Gimp Here That still works!
 All my images have been printed on **Tesco's Finest Premium Quality 120gsm paper **Up date, Tesco finest Quality Paper is no longer 120gsm but 100gsm if you can get it. (which you can't!) I now use paper/card from Staples, which is a lot heavier, but not so good and dearer!) Coloured with Promarkers. Even the elephant circles were printed on good weight paper and then fixed to card. You will probably want to use card. But I think good paper works just as well! Promarkers do bleed through the back so using paper and then card, hides this) To save pennies, some of my DT cards are not put together permanently, I quite often use white blue tack! So I can remove and replace some images. Shh! Don't tell! Link Here to go to Jak Heath's Tutorial on how to Resize Digi images in Word (Link is also on my sidebar) This post gets lots of visits so I'd love to hear what you think!
Here's a link to a Split Coast Stampers paper piecing tutorial too!


Discover your site recently..it is fabulous..you are very talented.loved the tutorial on paper pieceing
ReplyDeleteThank you Barbara! You've made my weekend!
ReplyDeleteI loved this tutorial! Thank you very much!
ReplyDeleteBeth - Brazil
Thank you Anonymous! Hey Nearly a year between comments!!
DeleteI just found you site thanks for sharing your
ReplyDeletegreat talent and great tutorial on paper piercing
Just looking around and waala!
ReplyDeleteGreat card. Very different. Nice.
Thanks sooo much for sharing.
Lynne from OZ
I just found your blog and love this tutorial although it could be just me it is a bit confusing for someone who is new to cardmaking. Thanks for the paper however it is adorable as are your cards. I will try it maybe even today.
ReplyDeleteLovely cards Lyn and I love the idea of the washing line. Only one baby expected so I don't have to worry about flipping the images, hehe. I love the details you add in your tutorial, like how you stuck the pink ribbon behind your 'made by' sticker.
ReplyDeleteAlso love the tip about white blue tack ;)
Made my first paper pieced bit on a card today. So effective! Thanks very much Lyn :0) Mo x
ReplyDeleteSuch a cute project and awesome tutorial
ReplyDeleteThank you so much for the sweet comment on my blog
Cheers
Dr Sonia
soniasv@rediffmail.com